JODY FU
OTTO
Fall 2015
MIT
2.009 Product Design Processes
Instructor: David Wallace


ABOUT THE COURSE
"In 2.009, Product Engineering Processes, students work in large teams of approximately 15 to 19 individuals to design and build working alpha prototypes of new products. Students learn aboutcreativity, product design, working within a budget, and gain unifying engineering experience. The effort spans the early phases of product development, including: opportunity identification; generating ideas; gathering customer and market data; selecting ideas, devising concepts and building sketch models; building and testing mockups; customer evaluation of mockups; embodiment design; and construction of a high quality functioning alpha prototype. The large teams must work effectively to realize this task, so students also learn about group dynamics, team roles and management, consensus building, and the value of communication.
Each year the teams work on projects unified by a theme (see the theme gallery for themes of previous years). At the end of the course, teams present their work to a live audience of ~1300 practicing product designers, entrepreneurs, academics, and classmates, as well as a large webcast audience."
Sketch Model Review
DELIVERABLE
Sketches, simple CAD models, and sketch models.
At this time, Otto was called "GhostBreaker" and the sketch model was a modifed clipboard attached to the longboard truck. Upon stepping off the board, the clipboard would engage with the wheels and stop the board.
Mock Review
DELIVERABLE
Technical or visual mockups and drawings answering key questions from the previous review.
The mockup was similar to a pair of scissor that opened and closed on the two front wheels. It was spring loaded and the opening ad closing was controlled by an Arduino.
From over 100 ideas pitched by members of the team, 6 were selected for the Sketch Model Review. From 6, 4 wer selcted for Mock Review. For both of these phases, I worked on a different product that innovated to develop a rapid chilling vending machine. The product dud not move forward due to its complexty for the course.
Assembly Review
DELIVERABLE
Technical design variations, renderings depicting product vision variants, and materials to help define the product from an interaction or technical view point.
EXPERIENCE
For this review, the team was split into four teams: market research, sensors, mechanical, and product integration. During the sensors team explored various sensors from membrane, strain gauge, to pressure for an electromechanical design and the mechanical team investigated a rack and pinion and linkage mechanism as well as a fully mechanical design. I was on the product integration team. I worked with the team to package the various mechanisms and sensors into a cohesive product. I defined the user interaction and prepared the majority of the user interaction storyboard through sketching and editing in Adobe Illustrator and Photoshop. I also worked on putting all the different components into an assembly and took large responsibility for the CAD, rendering and animations for the presentation, for which I presented on the various product architectures.
 |  |
|---|---|
 |  |
 |  |
 |  |
 |  |
 |  |
 |  |
 |

EXPERIENCE
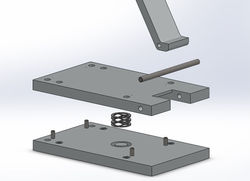
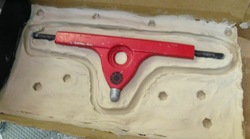
For this review the sensors subteam focused on the electromechanical design and the mechanical subteam focused on a fully mechanical design. On the product integration subteam, I worked on form and manufacturing of the housing for both possible product outcomes. The electromechanical design utilized a linear actuator for the braking mechanism. For the hanger design, I began with CAD of a standard hanger, added material to encase all of the components and then subtracting the components out. Realizing this hanger would be difficult to manufacture and prototype on our aggressive timeline. I created a design that could be quickly made by water jetting and milling 2D plates. The challenge was interfacing all components as neither team would have specifications defined until the end of the review. I also led experimentation with casting with 2 part resins in order to quickly prototype and achieve more complex designs, which could be 3D printed as the positive mold. I practiced the process by replicating a standard hanger. I used a cheap, fast curing clear resin for quick prototyping. The aesthetic detail and finish was on point, and we moved to casting the same hanger with aluminum filled epoxy, the strongest material offered for cold casting. Nevertheless, the hanger failed under user testing. To move forward with this process, we could over mold a steel plate.
 |  |
|---|---|
 |  |
 |  |
 |  |
 |  |
 |  |
 |  |
 |  |
 |  |
Technical Review
DELIVERABLE
A fully functional prototype that has considered the mechanical design details, human factors, systems integration, manufacturing, performance and reliability.
Final Review
DELIVERABLE
The looks like, works like, alpha prototype!
 |  |
|---|---|
 |  |
 |  |
 |  |
 |  |
EXPERIENCE
For this final phase, the team was split up into a business, presentation, and technical subteams. The technical team was further divided into three groups: Version 1, 2, and 3. The V1 team focused on producing a few of the fully mechanical prototype from Technical Review for user testing. V2 focused on improving the known issues and incorporating testing results into a final mechanism design. I led V3, which focused on specification integration from V2, the industrial design and methods to manufacture the final alpha prototype. While over molding steel with coldcasting was still a possibility, I was eager to explore metal casting methods which could deliver results quickly. This lead me to sandcasting and investment casting with FormLabs printable casting material. I spoke with a materials professor I have stayed in contact with since freshman year, who advised us to sandcast and ultimately helped pour the metal for us. I worked closely with another member to prepare the molds for three sandcasted iterations of the hanger, each improving on the interaction with the base, aesthetics, and design for sandcasting. I defined the final design for the hanger and worked with the team on finishing it for the alpha prototype. For the prototype, I selected a higher strength, but more costly aluminum (7065 over 6061) due to weakness of the casting process. Had there been more time, I would suggest heat treating, which would significantly increased the strength of the hanger. In this review I also was responsible for CAD assemblies, renderings, and animations for the final presentation, for which I was a Q&A representative for the design and manufacturing of the product.
Final Product
 |  |
|---|---|
 |  |
© 2013 by JODY FU. Last updated September 2014.